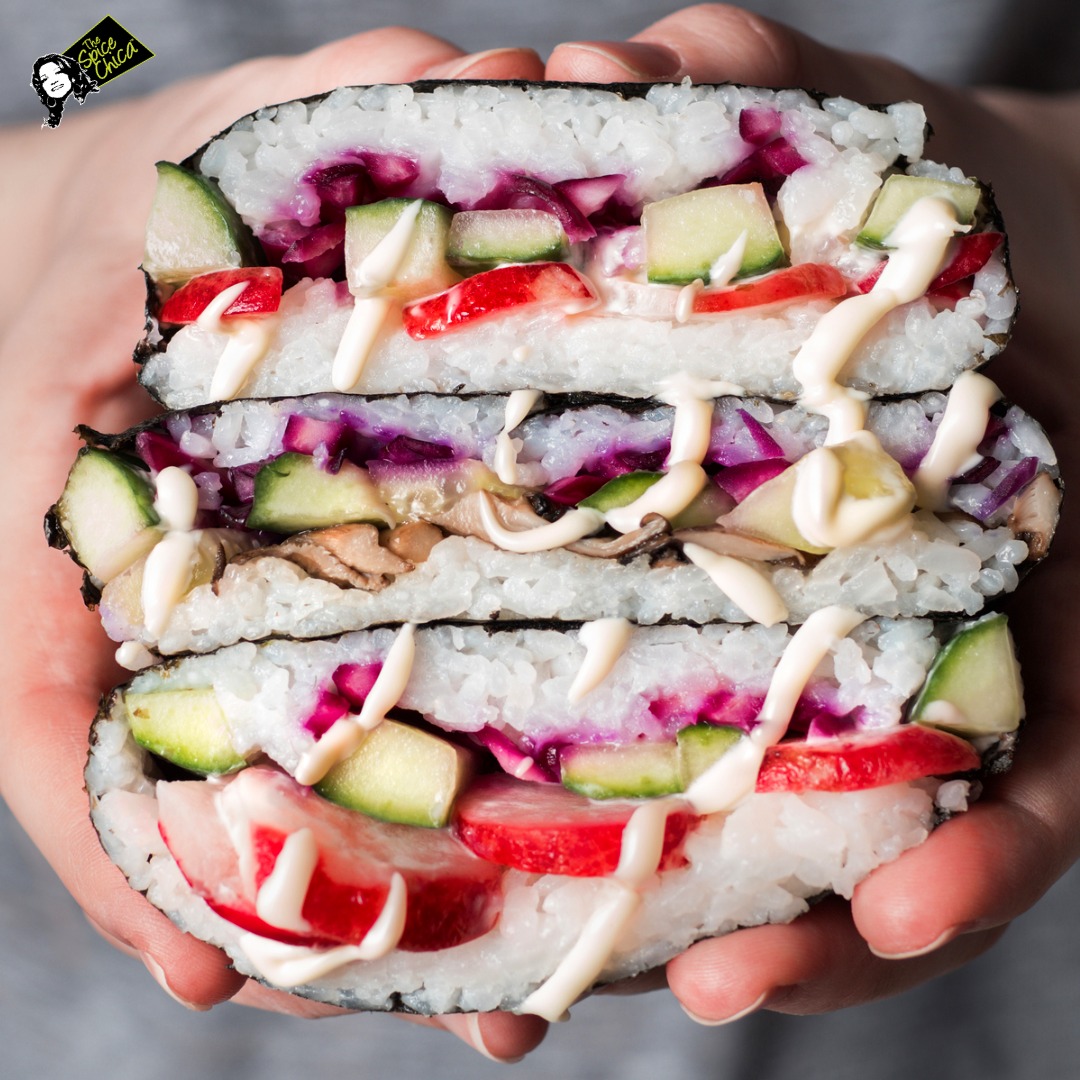
What is onigirazu?
Onigirazu is a type of Japanese rice ball or onigiri (sometimes also referred to as musubi or musubi), but rather than a traditionally shaped ball or a triangle, onigirazu is shaped into a flat rectangle, almost like a sandwich.
Where did onigirazu originate?
Interestingly, onigirazu first appeared in Japanese culture in 1990 in none other than a very popular comic book series known as “Cooking Papa.” The main character of the comic series is a salaryman (a Japanese term for a white-collar businessman employed by a corporation on a traditional salary) who is secretly a very good cook and enjoys cooking for himself and his family. The big secret is that he doesn’t want anyone, especially his co-workers, to know that his wife is unable to prepare anything worthwhile and that he is, in fact, the cook of their family and of all of the delicious bento lunches that he takes to work. He lies and tells everyone that his wife is an amazing cook. In one chapter of this comic book series, Papa invents onigirazu, which, is his version, takes less than 5 minutes to prepare. He basically spreads cooked rice on a large piece of dried seaweed, or nori, then proceeds to pile on various non-traditional rice ball fillings, then quickly folds his onigirazu closed, cuts them in half, and the result is two halves that look like an onigiri sandwich.
The name onigirazu is quite interesting and is a term that was derived from both the word onigiri (English translation: rice ball) which means to nigiru, or to mold (rice) in one’s hands, and nigirazu, where razu means the opposite, to not mold in one’s hands. Essentially, onigirazu means a rice ball that does not need to be molded in one’s hands.
Onigirazu may be enjoyed almost any time of the day. It can be eaten for breakfast, or as a snack, but it is most popularly enjoyed at lunch. Onigirazu is especially popular when included as part of a bento meal.
INGREDIENTS:
- 4 nori sheets
- about 4 cups of cooked sushi rice
- 1 avocado, sliced
- 25 g / 1 oz baby spinach
- red cabbage, shredded and pickled
- Sriracha or vegan mayo
TOFU KATSU VERSION
- 2 x 200 g / 7 oz firm tofu, pressed
- tamari or soy sauce
- 1 cup aquafaba
- 1-2 cups panko breadcrumbs (GF breadcrumbs for GF version)
- all purpose flour or cornflour (for GF version)
METHOD: TOFU KATSU VERSION
- BAKED – Set the oven to 200° C / 390° F and line a baking tray with baking paper. Toast panko breadcrumbs in a small pan until golden (they will gain more colour in the oven). Cut each tofu block into two 50% thinner blocks. Sprinkle tofu with some soy sauce (or tamari) or you can season the flour with plenty of salt instead. Drag tofu in flour making sure that the entire surface area has been coated. Dip the tofu in the gelatinous aquafaba and finally drag it in the pre-toasted breadcrumbs. Brush a bit of oil on the baking paper underneath the tofu and bake for about 30 minutes
(until crisp and dry) flipping the pieces to the other side half way through.
- BAKED – Set the oven to 200° C / 390° F and line a baking tray with baking paper. Toast panko breadcrumbs in a small pan until golden (they will gain more colour in the oven). Cut each tofu block into two 50% thinner blocks. Sprinkle tofu with some soy sauce (or tamari) or you can season the flour with plenty of salt instead. Drag tofu in flour making sure that the entire surface area has been coated. Dip the tofu in the gelatinous aquafaba and finally drag it in the pre-toasted breadcrumbs. Brush a bit of oil on the baking paper underneath the tofu and bake for about 30 minutes
ASSEMBLY:
- Cut a square of cling film slightly larger than your nori sheet. Place it on the table, place the nori sheet on top with the shiny side down and rotated 45° in relation to the cling film (SEE PHOTOS above).
- Wet your hands (keep a small bowl of water handy to wet your hands) and grab a handful of rice. Place it in the middle of the sheet and using your hands form it into a compacted square (about 9 cm / 3.5 ” by 9 cm / 3.5 “). Try to make that layer as even and compacted as possible. Season well with salt.
- Place remaining ingredients on top. For the tofu onigirazu, I put a layer of spinach, avocado slices, Sriracha and tofu katsu. For the sweet potato onigirazu, I used a layer of pickled cabbage, avocado slices, Sriracha and a sweet potato disc. At this point cover all the ingredients with another layer of compacted rice. I found it a bit tricky to get the rice packed tightly without squashing the ingredients underneath. My hack solution was to create that top layer of rice on a lightly oiled piece of aluminium foil, put this rice layer on the top of the stack and then peel the foil off at the end (see the video above). Otherwise you can get a special onigirazu mould that makes this easier, but I do not have one.
- Once you are done with your stack, seal all four corners of the nori sheet on top of the filling. Fold the right corner over the stack, wet the end of the nori sheet with a wet finger and fold the left corner over the stack and ‘glue’ it to the right corner. Repeat the same thing with bottom and top corners until you get a small packet.
Finally gather all the cling film over the stack and tie on the top. Put something moderately heavy (like a breadboard) on the onigirazu and set it aside to let the seaweed soften a little. Cut in half with a sharp knife.